For the longest time, a lot of Meta Quest 2 VR fans found it very strange that they could only use their Meta Quest 2s with a Facebook account, and it was a very strange requirement from Meta. However, to Meta, it was a solid way to boost their new member logins, especially amongst the younger demographic (whom the Quest was marketed to) who didn’t necessarily use Facebook anymore as other social media platforms had taken their attention away.
So, in the minds of the executives at Meta, forcing people to use either their existing Facebook accounts as mandatory logins to use the Meta Quest 2 or Quest 1 would be a great way to boost their sign-up numbers, especially as most Quest users would have had to log back into their old accounts or create new ones for those who couldn’t remember their passwords.
Fortunately, that foolish idea is no longer in effect, and now all you need is a Meta account to handle in-app purchases on the Oculus store and account management queries. So, to find out why you can now use your Meta Quest 2 virtual reality headsets without Facebook, just keep reading this article.

Meta Quest 2 Without Facebook
You no longer need a Facebook account to access and use your Meta Quest 2. Meta removed the requirement for a Facebook account to use Quest 2 and other Quest products on August 23, 2022. However, it does necessitate the creation of a distinct Meta account from Facebook. This account is used to manage your purchases as well as your digital library of Meta VR games.
However, this is a much greater compromise because most people dislike Facebook and believe it is a breeding ground for conspiracy theories and misinformation. Fortunately, Meta recognised the flaws in its reasoning and reversed the judgement in 2022.
What will happen to my old Facebook/Oculus account?
All current Oculus/Facebook accounts must be updated or combined with a Meta Account by January 1, 2023, to access Quest 2 and other Quest goods. You won’t be able to use your headset if, as of January 1, 2023, you haven’t altered or merged your account.
Even with a new Meta Account, does my data still get tracked?
Yes, Meta continues to collect and keep your data to create a profile of you. This can, however, be altered. For more information, see the ban on Quest products in Germany that went into effect in September 2020 due to their violation of the “coupling prohibition” outlined in the EU GDPR privacy laws. This is no longer the case because a Meta Account is again considered to be part of the Quest product ecosystem and is, therefore, once again available for purchase in Germany.
How To Log In To Your Quest Without Facebook
As the popularity of virtual reality headsets continues to grow, more users are seeking alternative options to log in to their devices without using a Facebook account. Titled Meta Quest 2, this headset offers an enticing solution by allowing users to create a social profile without the need for a Facebook login. With its sleek and sturdy design, the Meta Quest 2 headset provides an array of connected experiences that enable users to enjoy age-appropriate virtual reality content.

If You’re A New User And Want To Set Up Your Meta Quest Without Facebook
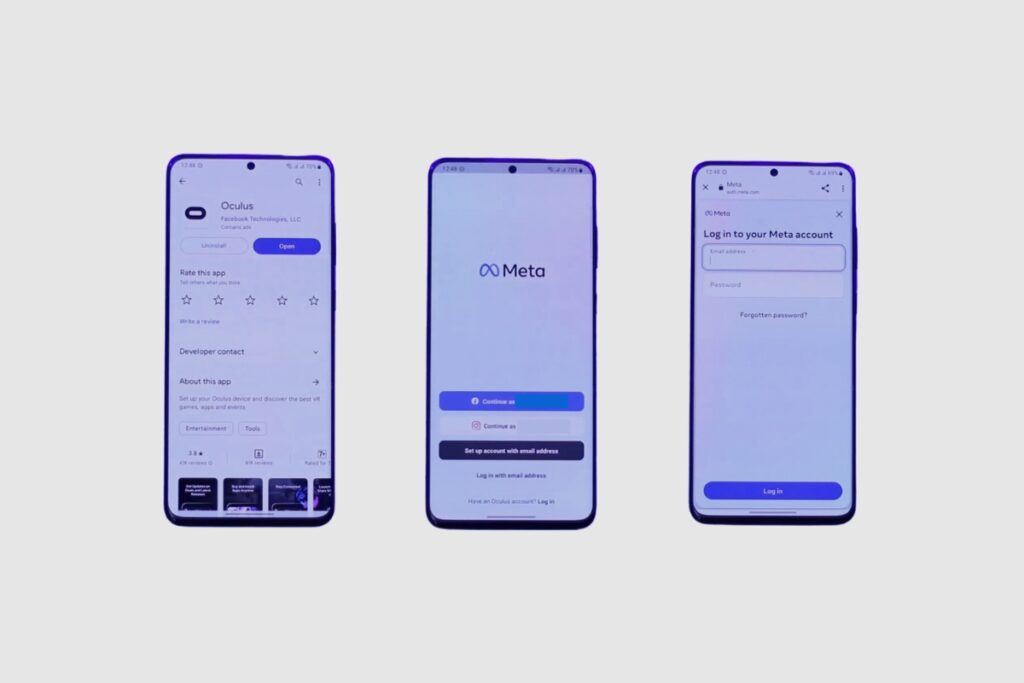
Setting up your Meta Quest without using Facebook is a straightforward process. To start, you’ll need to download the Oculus mobile app on your smartphone or tablet. Once installed, open the app and begin the pairing process by following the on-screen instructions.
During the pairing process, you will be prompted to enter a unique code displayed on your Meta Quest headset. This code ensures that only you can pair your device to your Meta account.
Instead of using a Facebook account, you can choose to create a Meta account using your email address. This alternative login option allows you to enjoy all the features and benefits of the Meta Quest without the need for social media.
After creating your Meta account, you can personalise your profile by setting up a display name and username and even uploading a profile picture. Additionally, you have full control over your privacy settings, allowing you to customise who can view your social profile and social media posts.
With the Meta Quest, you can have a connected and immersive virtual reality experience, all without the need for a Facebook login. Whether you’re gaming, exploring virtual worlds, or connecting with friends in VR, the Meta Quest provides an alternative login option that prioritises your privacy and user experience.
If You’re Logged In Via Facebook
If you’re logged in via Facebook on your Meta Quest device, don’t worry! You can still log in without using Facebook by following a few simple steps. Here’s how:
1. Visit meta.com/setup or meta.com/websetup, depending on your device, to begin the login process.
2. On the login page, you will see an option to log in with your existing Facebook account or with a Meta account. Choose the Meta account option to proceed without using Facebook.
3. If you don’t have a Meta account yet, click on the “Create account” button to set one up. You’ll need to provide your email address and create a password.
4. Once you’ve created your Meta account, you can log in using your email and password.
5. After logging in, you’ll have the option to personalise your Meta profile. Set up your display name, username, and profile picture to make your profile truly yours.
6. It’s important to note that all your previous purchases, friends, and game progress associated with your Facebook account will be automatically transferred to your new Meta account. You won’t lose any of your data or progress.
If You’re Logged In Via Oculus
If you’re currently logged in to your Quest via Oculus, you’ll need to create a Meta account to continue using your device without Facebook. Here’s how you can do it:
1. Visit meta.com/setup or meta.com/websetup, depending on your device, to begin the login process.
2. On the login page, choose the Meta account option instead of logging in with your existing Facebook account.
3. If you don’t have a Meta account yet, click on the “Create account” button.
4. Provide your email address and create a password to set up your Meta account.
5. Once your Meta account is created, you can log in using your email and password.
6. It’s important to note that all your previous purchases, friends, and game progress associated with your Oculus account will be automatically transferred to your new Meta account. You won’t lose any of your data or progress.

How to Delete a Meta Quest 2 Account
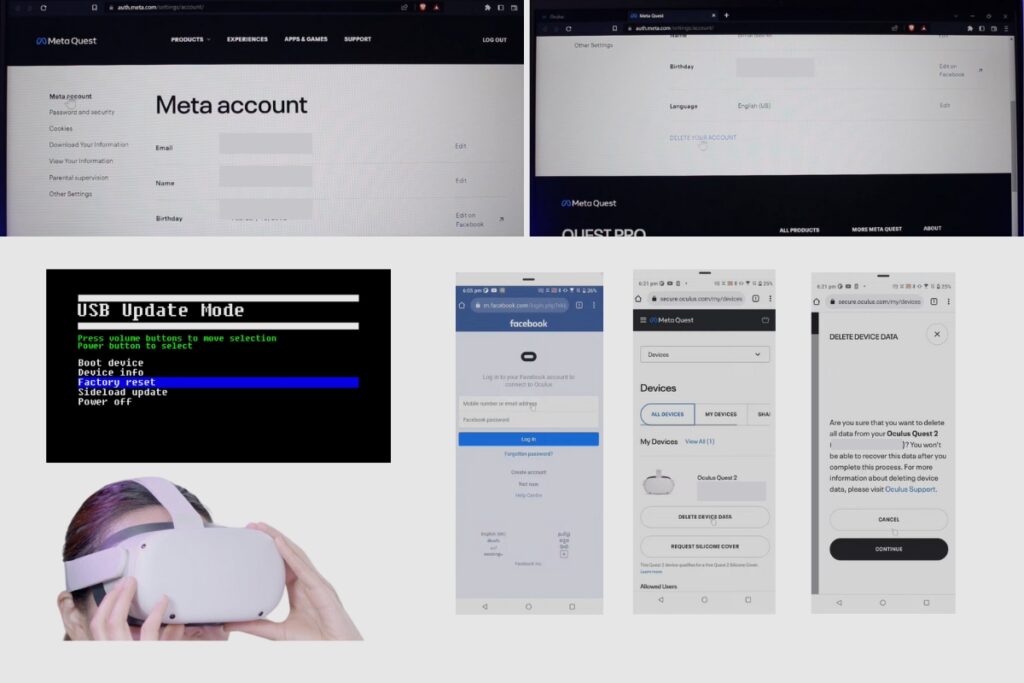
Your account information may be deleted from the Meta Quest 2 in one of three ways. The first technique entails either physically performing a factory reset on your device with your hands or utilising the Meta Quest 2 software to do it. Finally, you can delete all of your data and the device from your Facebook account by logging into your account on the Oculus/Meta website using your phone, app, or desktop.
How to Perform a Physical Factory Reset on Your Meta Quest 2
To execute a physical factory reset, you must first switch off your headset. The next step is to simultaneously press the power and volume buttons on your headset until the boot screen appears. To traverse the boot menu, use the volume buttons on your headset.
To pick it up, highlight “factory reset” and then hit the power button. Then, click yes and press the power button to begin the factory reset. After that, all of your information on the system will be erased.
How to Perform a Digital Factory Reset Using the Meta Quest Mobile App
To use your phone to execute a digital factory reset. Begin by launching the Oculus/Meta Quest app on your smartphone. Then, tap the bottom menu, then devices, and finally, the headset you want to factory reset. Then select advanced options, then factory reset, and finally, the reset button. Once it is completed, the factory reset will begin.
Please bear in mind that a factory reset is permanent and will erase any account information, downloaded games, and content from the headset. However, executing a factory reset on your headset will not delete any purchased content from your Meta account.
How to Remove Your Meta Quest 2 Device from Your Facebook Account
The first step is to log into your account, which you may do on a laptop or a mobile device. You only need to visit Oculus.com. After clicking the login link, enter your username and password to access your account.
You can access the menu by clicking the three bars on the side of your home page after logging in. Then, you must select your user ID from the drop-down menu. You can choose devices by clicking from there.
The number of devices that are linked to your Oculus account should then be visible to you. If you want to know which device to remove, you must confirm the device’s serial number to make sure it is the correct one. You can look for the device serial number on the headset itself or on the box it arrived in.
You must select “delete device data” after you have identified which exact device you want to delete. When you click on it, a message asking, “Are you sure you wish to delete all data from your Oculus Quest 2?” will appear. “Because after this process, you won’t be able to record this data.”
Click “Continue” if you’re certain you want to remove all of the data on the device. Once you click “Continue,” you must give them the email address you used to register for an Oculus account to prove that it is your account. The deletion process will then be activated by using the code that was supplied to your email address.
The same notice will appear as previously, asking you to confirm that you want to delete the device from your account once you have successfully input the code and the account has been validated. Additionally, you won’t ever again see the device on your list of devices.
All data on the device will be deleted after you click “confirm,” which will also remove the device from your account. Since this is a permanent process, you must ensure that any information you want to save is backed up on cloud storage.
Final Thoughts
Now that you know you don’t need a Facebook account to create a profile or use the Meta Quest 2, you should be ready to play as many games as you like. That is, provided you have a Meta account, because you still need it to manage your purchases as well as your digital library of VR games.
However, that shouldn’t be much of a problem for you, and you should be fine with using your Meta Quest 2 if you want. Once again, I’d like to thank you so much for reading this article. I hope you enjoyed reading it as much as I enjoyed writing it. If you have any questions, please feel free to ask them in the comment section, and I’ll answer them as soon as I can.

